Photosynthesis Response Curve with Floating Disk Assay
Over the years I’ve made the claim that the floating leaf disk assay is quite possibly the best way for students to explore how the process of photosynthesis. The method is inexpensive, accurate, reliably replicable and most importantly accessible for all levels of students from 5th grade to university. However, I’ve got to say that even I was surprised at some data I collected, yesterday. Recently, while working on new AP Biology Labs, I revisited the original (and still the best) paper that first discussed this technique. (or at least the earliest I can find.)
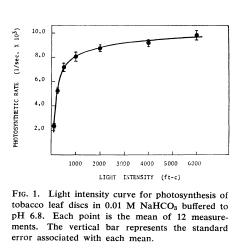
Wickliff, J. L., and R. M. Chasson. 1964. Measurement of photosynthesis in plant tissues using bicarbonate solutions. BioScience 14, no. 3: 32–33.
In this article I saw this graph of a photosynthesis light response curve that got me to thinking:

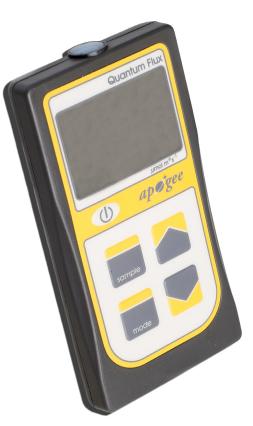
Last year, the UKanTeach program where I teach acquired a couple of PAR (photosynthetically active radiation) meters to measure photon flux. PAR meters are typically on the expensive side but this model from Apogee runs about $300. I hadn’t taken time to try them out and decided that now was the time.
Yesterday, I went out the north side of Haworth Hall and picked an ivy (Hedera helix) leaf that was growing in deep shade under a shrub.

I picked a shade adapted leaf figuring that a leaf adapted to shade would likely reach photosaturation earlier than a sun adapted leaf. I wasn’t sure whether or not my light source was bright enough to induce photosaturation.
My light source is a clamp shop light with an 8 inch reflector and an 100 watt equivalent compact fluorescent bulb. Actually, I found that if I put my meter within a couple of inches of the bulb I can get a flux reading equivalent to a summer’s day. I was sure it was bright enough for the shade adapted leaf I had picked.
I modified the technique that I presented here by placing the infiltrated disks in shallow petri dishes instead of plastic cups. I also modified the data collection procedure. Instead of counting disks floating at the end of each minute, I actually attempted to time each disk–a bit of a challenge that I wasn’t quite up to the first time. I should have used a video camera or at least used a computer timer program capable of timing 10 or more “laps” or intervals.


It is real easy to record the first movements of the disks with this technique.
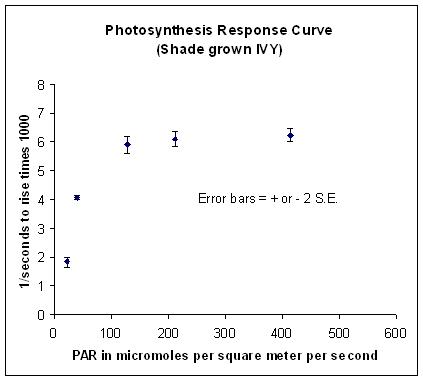
In low light conditions, I started by carefully cutting about 80 disks from one leaf. I then infiltrated ten disks at a time with a dilute bicarbonate solution with a vacuum created with a 10 ml syringe. I placed the 10 sunken disks in separate petri dishes with a total of 30 mls of bicarbonate solution. The dishes with the disks were then placed under a box lid to exclude any light. I then tested 6 of the sets of 10 disks under different light intensities. The data from the highest light intensity are not included because I neglected to use a water heat sink filter to keep the infiltration solution temperature constant. The higher temperatures affected the results. It was only when the light was very close to the petri dish that this was a problem but I need to account for this next time.
Here’s the results:

Note that I’ve plotted plus or minus two estimated Standard Errors for each mean. I was impressed. This is a classic response curve and the parameters of this curve are consistent with data reported in the literature for shade grown English Ivy. I’m more convinced than ever that the floating leaf disk assay is a very valuable tool for a biology teaching laboratory. With this technique students can start their exploration of photosynthesis but the same technique is powerful enough to explore more sophisticated concepts.


Great way to measure photosynthesis and respiration. Shouldn’t you do both and subtract to get net photosynthesis?
Is ten disks really sufficient? It would appear to allow for large random error. How about 20?
Using bicarbonate, how much variation can you have in pH before affecting the results. If light and not CO2 limits, then you’re set. Discovering the variation of photosynthesis with pH is a good experiment too.
Using colored filters always seemed a bit crude to me. These days, you can readily obtain bright LEDs in many colors. These are close to monochromatic. The problems you face are measuring the photon intensity reliably across different wavelengths and having enough LEDs to achieve saturation without prior experimentation. It’s easy enough to vary light intensity by changing the number of LEDs that are lit and by adjusting the distance to the petrie dish.
I’m interested in the potential for redoing photosynthesis this way instead of the classic DPIP approach, which I found to be fraught with errors from a variety of sources. I have very many filmed experiments with varying light color, light intensity, and pH. I believe that students will better relate to the floating disk approach. Once you have the films, it’s easy enough to provide the counting just as we now do with seed germination.
Great way to measure photosynthesis and respiration. Shouldn’t you do both and subtract to get net photosynthesis?
The disk rise due to excess oxygen production—you are actually measuring net photosynthesis. You can infer gross photosynthesis by measuring the rate of respiration (also possible with this work) and then adding this to the net.
Is ten disks really sufficient? It would appear to allow for large random error. How about 20?
Depends on the variability of your sample—in this case I plotted two standard errors above and below each mean. Plus or minus two standard errors describes the boundaries for approx. 96% confidence interval. In other words I’m better than 96% confident that the true mean of my population I’m sampling at each light intensity lies between those error bars. One way to determine sample size is as a function of standard error….
Using bicarbonate, how much variation can you have in pH before affecting the results. If light and not CO2 limits, then you’re set. Discovering the variation of photosynthesis with pH is a good experiment too.
True. That is why I mentioned that I did not use a buffer to maintain a pH around 7….I might get even better results if I had. Likewise I did not indicate the concentration of the bicarb—its is low. We’ve done work to show that very small concentrations of bicarb permit photosynthesis in this technique—too much inhibits its. I’m convinced it was not problem in this investigation–at least not until the temp. got too high. More work to do….
Using colored filters always seemed a bit crude to me. These days, you can readily obtain bright LEDs in many colors. These are close to monochromatic. The problems you face are measuring the photon intensity reliably across different wavelengths and having enough LEDs to achieve saturation without prior experimentation. It’s easy enough to vary light intensity by changing the number of LEDs that are lit and by adjusting the distance to the petrie dish.
LED’s are a great possibility—one I have encouraged my students to use. Generally, I let my students design how they wish to measure color transmission and absorbance. That is one of the reasons I got the PAR meters—so that we could change colors but maintain equivalent photon flux….
I’m interested in the potential for redoing photosynthesis this way instead of the classic DPIP approach, which I found to be fraught with errors from a variety of sources. I have very many filmed experiments with varying light color, light intensity, and pH. I believe that students will better relate to the floating disk approach. Once you have the films, it’s easy enough to provide the counting just as we now do with seed germination.
The evidence seems to indicate that students (and teachers) find this technique more accessible and it promotes true student inquiry.